Do you have a whole lot of visual clutter around your TV unit? Is a pile of annoying cords collecting dust, and making the whole area look messy and cluttered? Today, I'm doing a mini-makeover of a TV unit and sharing some easy tips for how to organize cords behind a TV unit, in order to create a more organised and neat looking space.
Is this a sight that you can relate to?
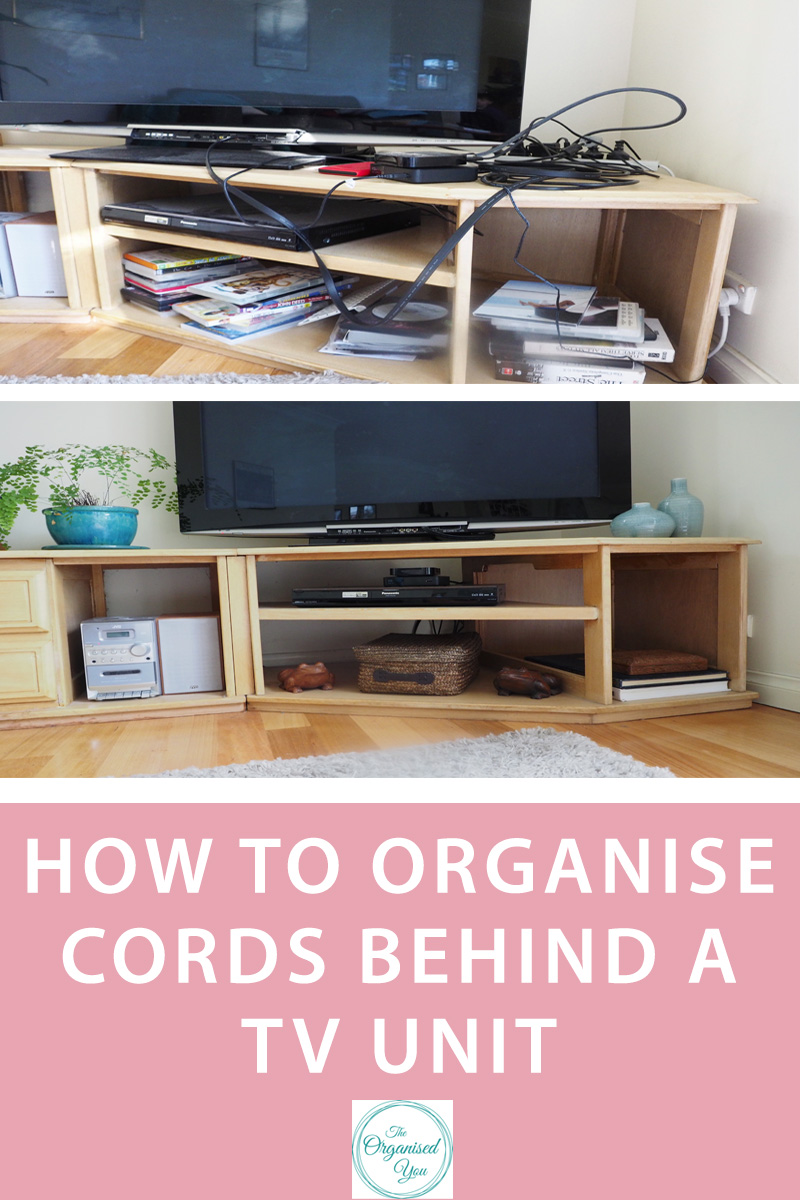
With all the different devices we seem to have nowadays - Apple TV, WD TV, DVD, gaming equipment - it's no wonder cords start to pile up around the TV area and become difficult to wrangle! This is what I started with for this project - not terrible, but the cords and DVD piles were gathering dust, and visually they made the space look cluttered and untidy.
The first step was to give all the surfaces a 'preliminary' dust, just so there wasn't a whole lot of dust flying everywhere as I cleared and organised. I used my handy mitt-duster for the job.
Next, I turned my attention to the piles of DVDs that were taking up essential storage space.
Luckily, this TV unit had 2 deep drawers right next to the TV - one that held CDs and the other that held DVDs. It can be difficult in this new age of technology to decide whether these items are actually even necessary anymore - I mean, how often do you even watch DVDS, when you've got Netflix, Apple TV, Foxtel....? But if you can't bear to get rid of your DVD collection just yet, I suggest putting them in slimline cases (like I showed you here) to reduce the bulkiness and create extra storage space.
For this project, I wanted to focus on the task at hand, so for now the DVDs were just stacked neatly in the drawer. Unfortunately the drawer wasn't quite deep enough for the DVDs to all go on their side, but was substantial enough to hold all the DVDs that were previously cluttering up the TV unit. Win!
The remaining space was given a really good wipe-down. That's one of the great things about organising - it makes everything so much easier to keep clean! Packing away those DVDs gave me 3 fairly clear shelving areas to work with. So, instead of having all that extra technology equipment stacked to the side of the TV, I wanted to use these shelves to store them instead, which meant 'feeding' the cords through the back.
In our own home, we always try to hide the visual clutter of cords by using this strategy. With our own TV unit, Damian actually made a few holes in the wall to make the TV cords completely invisible (as you can see in the picture below).
It doesn't have to be as dramatic as making holes in the wall though. With our home office, we moved the desk forward slightly to make room for the cords to go at the back, and clipped the cords to the back of the desk with bulldog clips. In our entryway, we attached the lamp cord to the console leg with tape so it wasn't visible.
With our charging station, we attached small hooks to the side of the unit for the cords to sit in, so only the charging bit (does it have an official name?) would be showing, and still accessible.
Another option is to cut some small holes in the back of the unit/bench/desk to feed the cords through, like my Dad did with his laundry bench.
Now, before you start unplugging anything to change the position of the cords, make sure you know which cord belongs with which device! Use simple labels to wrap around each cord. I'd recommend using washi tape as it stays put and won't peel off!
Once you know which cord belongs to which device, you can start unplugging and moving things around. For this project, I simply stacked the devices on top of each other in a nice central position (nice and easy to point the remote at!).
I then put the power board right at the back of the unit on the floor, as it's not something that needs to be accessed regularly, but is still easy enough to get to if necessary. The cords were fed through the space at the back of the unit and reattached to their different devices. Because the back of the unit is open, the cords were still visible, so I attached a large bulldog clip around them to make things a little neater.
The 'extra' things that were previously just sitting on top of the TV unit and aren't used all the time, such as USB sticks and backup, were placed inside a lidded wicker basket. Baskets and boxes are always a good strategy for hiding clutter as you can put the lid on and forget about it!
I also collected the manuals and warranties that were cluttering up this space...
And popped them into the basket. You could also file these things away, as they're not items you need to access regularly.
Clearing the cord clutter made extra room for all the pretty decorative display items on this unit, so with a bit of rearranging, everything was looking so much neater and prettier. Aaah, nothing like a quick and easy makeover!
Another little before and after just to appreciate the power of a little organising...

What could you do to organise the cords in your home?
Be it the bulldog clip, feeding cords through the back, or hiding them with hooks, it really does make such a difference to get cords organised!