Wardrobes are definitely tricky spaces to keep organised. New clothes are brought in without clearing out old ones, shoes pile up, you try on lots of outfits for a special occasion and don't hang them back up. It's all too easy for things to get out of control! Today I'm sharing how I helped my client create a more organised wardrobe with a few clever storage systems.
I shared this client's home office makeover a few weeks ago, but I actually organised her wardrobe a few months back. Lucrezia was so pleased with the finished closet that she asked me back to tackle the home office. So I'm excited to show you today what we were able to accomplish in 4 hours with her wardrobe.
Here is what we started with:
Lucrezia's main wardrobe issues were:
- The top shelf of the closet had become a dumping ground, and she either couldn't remember what was in there, or couldn't quickly find what she needed
- The shelving unit on the bottom right of the walk-in closet was in an awkward spot and was overflowing with clothes, so the drawers wouldn't shut properly
- The floor of the closet was also cluttered with boxes and bags, so it was difficult to access the hanging clothes
The open shelving unit to the right of the closet was a jumble of shoes, bags, hats, scarves and belts and needed a good sort and declutter. Lucrezia's goals for the wardrobe area were to have everything easily accessible; have good systems in place; and to make it a more usable space.
>> If you'd like to learn the step-by-step process for tackling the decluttering of any space in your home, then check out my guided, online course 'Chaos to Calm' right here! >>
The first step I always do in any organisation project is to remove everything. Although this can be quite overwhelming (like I felt when we removed all our junk from the garage!), it helps to give you a better vision for the space, provides a blank slate, and means you're only putting things that you absolutely love back in.
One of my first suggestions was to remove the door of the closet, as it was making it difficult to use the space effectively. There was also enough room at the top of the closet to add an extra level of shelving. Luckily, Lucrezia's husband Richard is very handy, and was able to add the shelving quite easily, giving the closet a lot more storage. We also removed the pull-out drawer unit at the bottom right as it took up so much room and was hard to access.
Next, it was time to start sorting! Lucrezia went through her shoe collection, making sure that only the pairs she wears and loves made the cut.
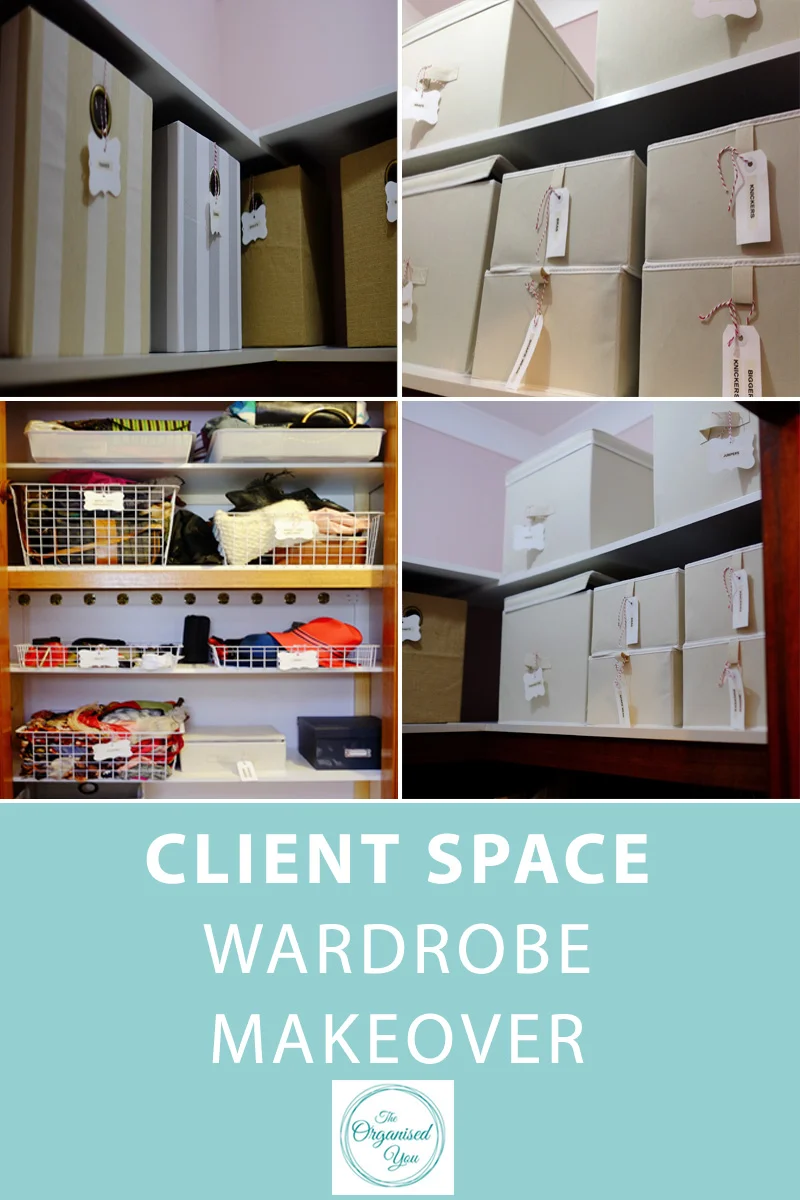
We had a nice big area to spread everything out, and began sorting and categorising every last item of clothing - from tops, scarves, hats, belts, wraps, scarves, pants, gym-wear, swim-wear, undergarments... Everything had a place to go! I recommended fabric storage boxes, and Lucrezia got these ones from Bunnings. You can find similar products at Ikea, Target, Howard's Storage World... they are a fantastic storage option in a wardrobe. We also had some wire baskets and larger storage boxes to store bulkier items, such as bags and hats.
I popped some temporary post-it notes on the boxes so we knew what was going where. We also had 'donate' and 'sell' piles.
Here's the finished closet, which Lucrezia can play around with over time by easily moving a box or basket to suit her needs. We ended up categorising her amazing bag collection into used frequently, sometimes, and special occasion bags (on the top shelf). The more special belts were rolled and placed in a basket, while the rest were hung on a belt-hanger inside the closet. The small black box near the bottom holds a few care items, like lint-removers.
Shoes were neatly arranged on a shoe-rack on the bottom shelf of the open closet.
I labelled all the storage boxes and attached the labels with some twine. Everything now has its place! Again, Lucrezia can easily play around with the arrangement of the boxes to suit her needs e.g. jumpers can live on the top shelf until winter, swim-wear can be swapped out when the hot weather is over etc.
A quick before and after, very pleased with how this turned out: