Thanks to the wonderful feedback I received when I last shared a client space (this beautiful sewing room), I thought I would make this a regular feature on the blog so you can see exactly what a personal organiser does! Today's makeover is a home office space. I'll show you how we decluttered and organised 2 rooms and set up some workable systems to deal with the paper clutter.
I received a call from Lucrezia, who works from home with her husband on 2 different businesses, and needed some organisaitonal help. They have a lovely big office with a beautiful outlook onto their garden, plus the use of a large entry/hallway outside the office. Although Lucrezia was lucky to have lots of storage space, this can also be a problem because it becomes all too easy to fill it up.
Lucrezia's organisational goals were:
1. Tidy everything and sort through
2. Have good storage systems set up
3. Make it a more professional space
This job required 2 stages. The first stage, which I am about to show you, took 7 hours over 2 days. I will be returning at the end of March to finish things off completely, once Lucrezia has sorted through her personal and business paperwork. After our Skype consultation, I researched some clever systems for dealing with paper clutter, but recommended that Lucrezia not buy anything until we had finished this initial 'sorting' stage. Let me show you what we were working with...
This is the couple's home office. Richard's side (with his desk to the left along the main window) has 2 great sets of drawers (1 was empty and waiting to be filled!), the printer and some other equipment.
The shelves, which Richard constructed, hold various folders, magazines, invoices, cards, bags etc. Through the door you can see the adjoining entryway.
To the right of the door is Lucrezia's side of the office - again holding lots of folders, miscellaneous stationery items, books, and loose paper.
These piles next to the desk are Lucrezia's biggest trouble spot. One of the main reasons she asked me for help was to set up some organisational systems to deal with the paper clutter.

And here is the entryway. On the right side, there's 2 filing cabinets and more shelving, holding books, magazines, kids' art supplies and travel nick-knacks. Lucrezia also teaches language classes, and the materials for those are in the tubs on the floor.
On the left side is a metal shelving structure holding brochures and pamphlets, and more shelves holding personal and travel items, boxes of Richard's photos and photography equipment, as well as business and personal folders.
If you'd like to learn the step-by-step process for tackling the decluttering of any space in your home, you can check out my guided, online course 'Chaos to Calm' right here! >>
After a look at the space, it was time to dive in! As Lucrezia had explained to me exactly what was in the two spaces, we were able to come up with 'zones' into which it could all be sorted. One of the biggest problems I could see was that everything was mixed up - personal files were in with business information, the two businesses were not separated, there was kids' art supplies in with photos, stationery supplies were spread throughout the office etc.
So the very first step was to remove everything and create piles. Although this can be a rather overwhelming process, as it feels like you're just 'moving stuff' and creating more mess, I find it absolutely essential to have a clear space in order to create a new vision for the space.
You can see below some of the piles that we created, and some useful discoveries we made along the way...
Separating the two businesses was essential. We also started to create piles for shredding and things that could be returned to friends/clients/co-workers.
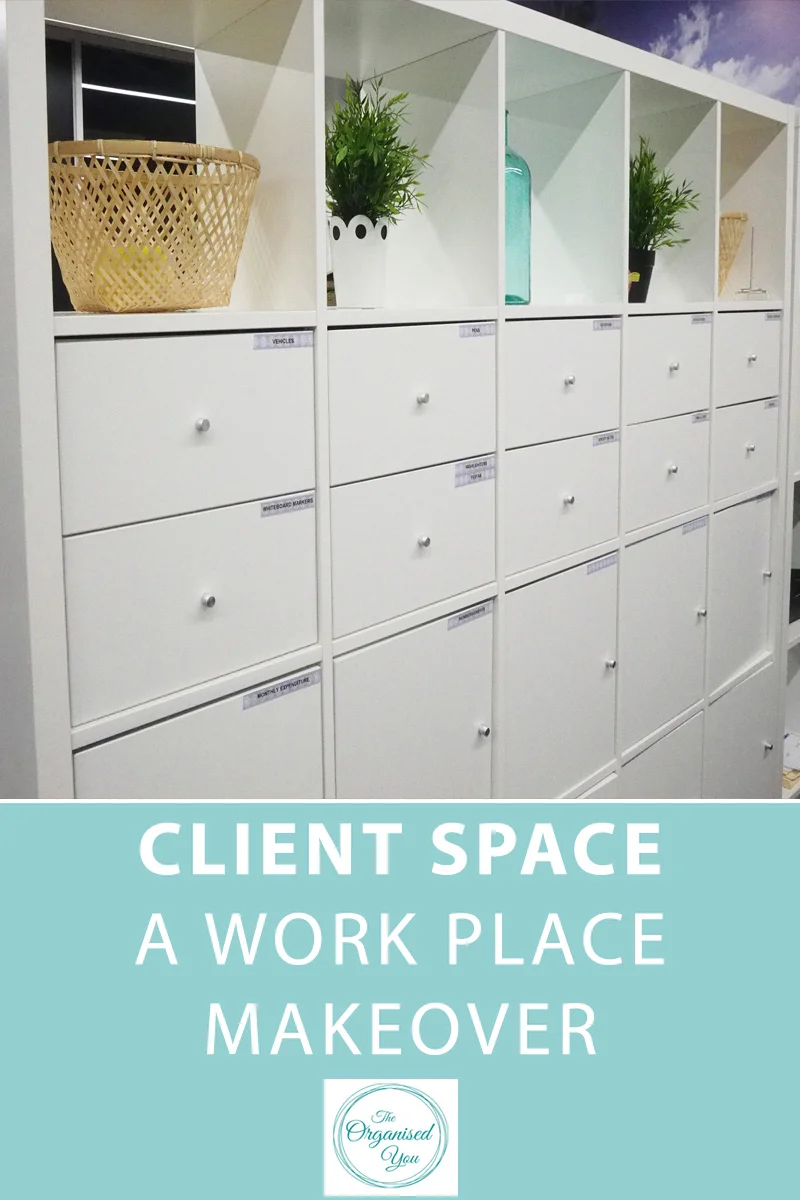
One of the filing cabinets was empty, so instead of having all those bulky folders taking up valuable storage space, it makes much more sense to have the paperwork organised and sorted within the filing cabinets. For now we just piled the folders on top of the cabinet and shelf, as Lucrezia would have to do a lot of sorting through these first. The filing will be completed during phase 2 of the home office makeover.

Finally a clear space in the entryway...
And pretty much clear in the main office, apart from stationery bits and pieces.
While Lucrezia sorted and sorted some more (luckily she had heaps of floor space to create piles)...
I made headway on the left side of the office, which I designated as the spot to house stationery and supplies (the sticky-note labels were temporary of course!). The pink folders now hold printer paper, glossy and photo paper, labels and plastic pockets. The small black unit with drawers categorizes all the stationery supplies into separate organised drawers. Some other storage boxes that we found throughout the 'purge' now hold items like bank books, business cards and blank cards.
The large supply of magazines on the shelf all contain articles that Richard has written. My suggestion was to carefully remove each article along with the front cover of the magazine, and put them in a display book. This gets rid of a large amount of clutter, and gives Richard a book he can be proud to show off to clients.
The small cream and grey filing cabinet now holds essential stationery items such as printer cartridges, envelopes and stamps, business paper and courier envelopes.
I attached most of the labels to the boxes and folders and called this side done for now. The magazines still need to be sorted and the in-trays dealt with.
I decided the top shelving on the right side of the office should be used to display all the wonderful products the couple has produced, including books, postcards, CDs and brochures. I brought in all the books from the entryway that were related to the business and alternated vertical and horizontal stacking to create more visual appeal. Little nick-knacks were popped on top of books and on the shelf to show the couple's love of travel, which ties in with their travel business 'Around the Sun'.
This side of the office is also coming along well, but there is still more sorting of paperwork to be done (as can be seen on the right, although Lucrezia did get through a great amount during the time I was there!). New systems will also be set up to reduce paper clutter - we are thinking of going with wall racks, like these. The cardboard files and in-box trays will also be replaced with more visually appealing storage containers (like these magazine files or these pockets).
In the entryway, we loosely categorized the boxes. Nearly all of them hold Richard's photos and photography equipment, so for now we just stacked them neatly on the shelves. When I return, we will be labeling and dating everything so that if Richard wants to digitize the photos at some stage (which would be an enormous job), he will at least know where to start!
If you'd like to learn the step-by-step process for tackling the decluttering of any space in your home, you can check out my guided, online course 'Chaos to Calm' right here! >>
It's hard to show through photos just how much we accomplished on the day, and what a huge process this was. Lucrezia and I were both so pleased with what we achieved in the time, and I can't wait to get stuck back in to 'pretty' everything up and get those paper storage systems in place.
Here are some before and afters to show you the difference: