Hands up if you have an overflowing stationery or junk drawer somewhere in your house? No doubt it's full of those bits and pieces you need close at hand - scissors, sticky-tape, permanent markers, rubber-bands.... the essentials! There is no point having these items stored away in a home office or randomly scattered throughout the house in mystery locations - they should all be in one place where you actually use them. But it's all about keeping the stationery collection organised so you can easily find and access what you need! Here's how I do it...
Ideally you might have a drawer in the kitchen, but if your kitchen space is limited, free-standing drawers are a great solution. We have 2 sets of cardboard drawers that we got from Ikea about 3 years ago, and they are a cheap storage solution. Plus they fit perfectly onto this unit that we use as a charging station and to organise our daily paperwork. This unit sits in a corner of the living area.
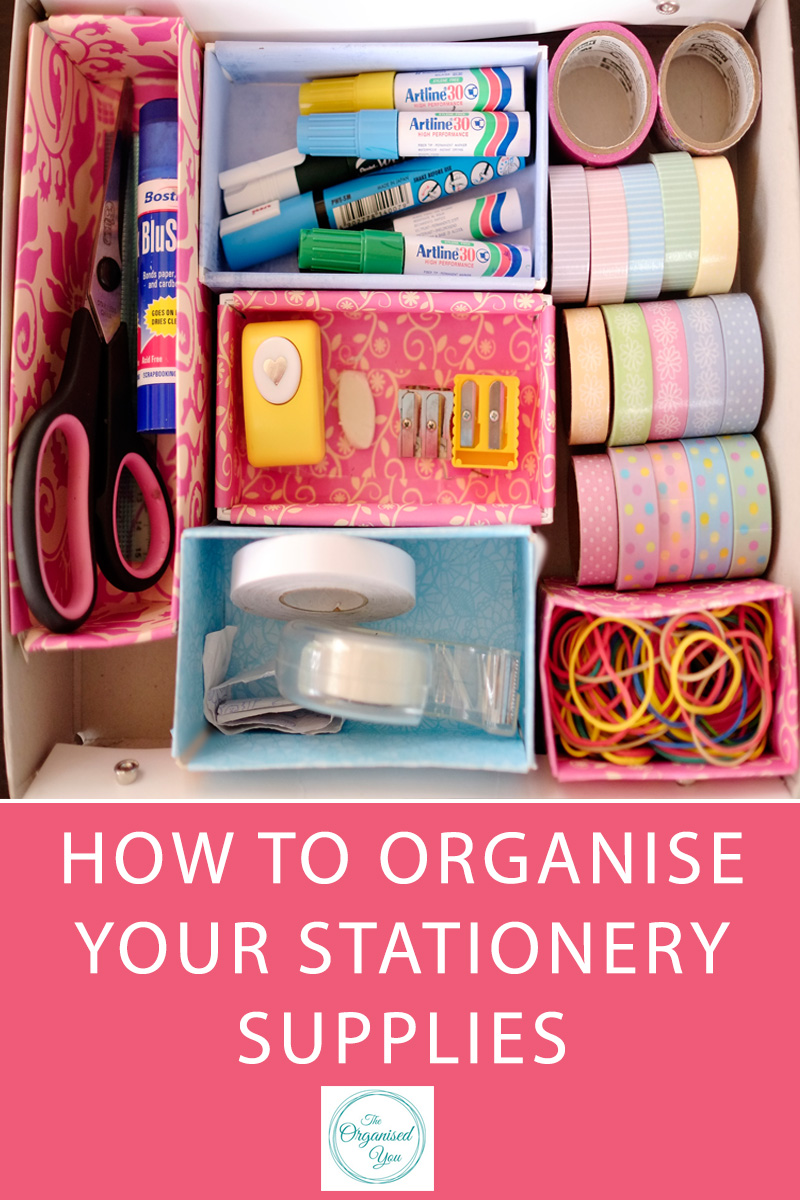
The top drawer is where I keep all the stationery that I need to access on a regular basis. However, it was not quick and easy for me to find what I needed as the stationery was just thrown in and jumbled up. I can't stand having to dig around for things!!
I wanted dividers for the different items, but also wanted the drawer to look pretty. I saw this great idea on Pinterest, using cardboard boxes covered in colourful scrapbook paper to keep everything neatly separated. Winner!
So after a grocery trip, I made sure to save the cardboard boxes to use for this project. First, I measured the height of the drawers and then cut the cardboard boxes down to size using a box cutter. I then covered each box with some scrapbook paper (tutorial here) so I would get a nice colourful view each time I opened the drawer.
I played around with the arrangement of the boxes to make sure they fit reasonably well inside the drawer. My washi tape collection is growing, so I'll probably need a new storage solution soon, but for now they fit neatly down the side of the drawer without requiring a box to hold them in place.
Here's a look at each section, starting with scissors and glue...
Hole punch, sharpeners and a rubber (my 2 year-old's favourite tool at the moment!)...
Sticky-tape, double-sided tape and blu-tack...
Permanent markers and chalkboard markers...
Rubber bands...
Scotch tape and washi tape!
I keep pens and few pencils in the file holder, which is placed on top of this storage unit. Because I access them regularly, I didn't want to have to open up the drawer every time I needed a pen.
You could always buy dividers to organise a drawer, but I quite like the option of changing colours or box sizes to fit different items. All in all, a cheap, easy and organised project!